 Scheduling
|
User's Guide Topics
|
Contents
One moment before we get to the actual scheduling process, we would like to introduce the Navigation Pane. This pane is used to select whose timetable you see on screen and for which days. Once you are familiar with this pane, you will be ready to learn how to actually schedule activities.
A timetable that you see on screen is like a chart. It has two axes. One axis contains periods. The other axis contains days and resources. The intersection of a resource, day and period is one cell in the schedule and it contains all the scheduled activities of the resource on that day and period. The Navigation Pane is simply where you choose the resources and the days that go on the X axis (unless the axes are flipped).

Day Selector
The first button in the navigation pane is a drop down selector in which you select the days. Clicking on this button will display the days that you have entered in the Resources pane's Day page.

To select a single day or the entire week, just click on their name (not in the check box but directly on their name). To select several distinct days, use the check boxes at the left of them. When you are finished, click anywhere outside the popup list. To select or deselect all the days in the list, use the check box at the title of the popup list.
You can also use the mouse's wheel button to scroll days without even opening the popup list. Just place the mouse cursor over the day selector button in the navigation pane and then scroll the mouse wheel up or down. What will happen depends on your previous selection. If you had a single day selected, the wheel scrolling will move one day forward or backward. If you had two days selected, the wheel will select the next or the previous two days and so on.
![]()
Resource Type Selectors
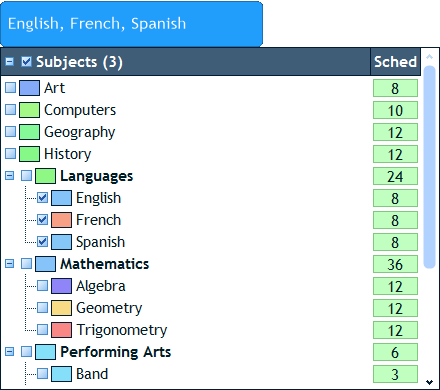
The following 6 buttons are used to select the type of the resource(s) that the schedule displays. Each button corresponds to a different type of resource. The types from left to right are: subject, group, student, teacher, room and equipment.

These buttons are mutually exclusive, meaning that if you select one of them, the one that was previously selected gets deselected. This is because a single schedule grid can display the schedule of only one type of resource, i.e. you can't mix in the same grid the personal schedules of students and teachers. You can however split the screen to multiple grids – something that is explained later.
Resources Selector
The last button in the navigation pane is where you select the actual resources whose schedule is displayed. If you click on that button a popup list of resources is displayed. It contains all the resources of the selected type (the type that was selected using one of the 6 buttons above). You can select one resource in this popup list, several resources (using the check boxes next to each resource) or you can select all the resources (using the check box at the title of the popup list).
Just like the days selector, you can use the wheel of the mouse to scroll resources back and forth. Place the mouse cursor over the resources selector button, but don't click on it. Then, scroll the mouse wheel up or down.
Tabs and Window Splitting
At the top of the navigation pane you will find a narrow row of tabs. These tabs are like the tabs at the top of a web-browser. What you do in one tab does not affect the other tabs. Each tab remembers a certain selection of days and resources. When you make choices in the navigation pane, they are remembered by the currently active tab. When you switch to another tab, you are immediately navigating to the days and resources that were last selected when that other tab was active.
![]()
You can open as many tabs as you like. To open a new tab, click on the last tab which says "New". To close the current tab, click on the "X" icon at the end of the tabs row.
![]()
At the end of the tabs row you will find two additional icons: "-" and "|". These can be used to split the currently active schedule window (the active schedule window is the one you last clicked in) into two windows, either horizontally or vertically. You can continue the splitting process until your reach the desired layout of windows on the screen. For example, to create a 2x2 layout, you can first split a window horizontally to two parts and then split each of these parts vertically. Notice how each time you split a window, a new tab is added to the tabs row. That is because a new window is created each time.
You can delete a split window using the "X" icon at the end of the tabs row. The currently active window is the one what will be deleted if you click on that icon. By the way, if you delete all the windows in this manner (by clicking the "X" icon over and over again) the entire workspace will be closed. So unless you want to do that, make sure you leave at least one open.
Drag and Drop Scheduling
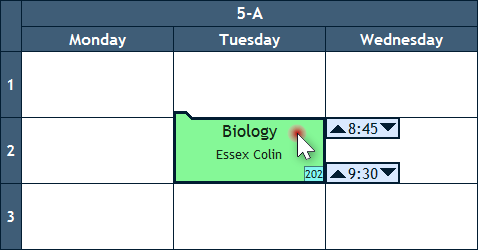
The process of scheduling activities (and sets) using drag and drop is simple. You pick an activity from the Activities pane and drag it with the mouse to the cell in which you would like to schedule it. Then you drop it there. Thus the activity gets scheduled. Let's go over the technicalities.
The first step is to place the mouse cursor over the first column in the activities' list - the column which displays the activity's color. The mouse arrow cursor will turn into a hand cursor.
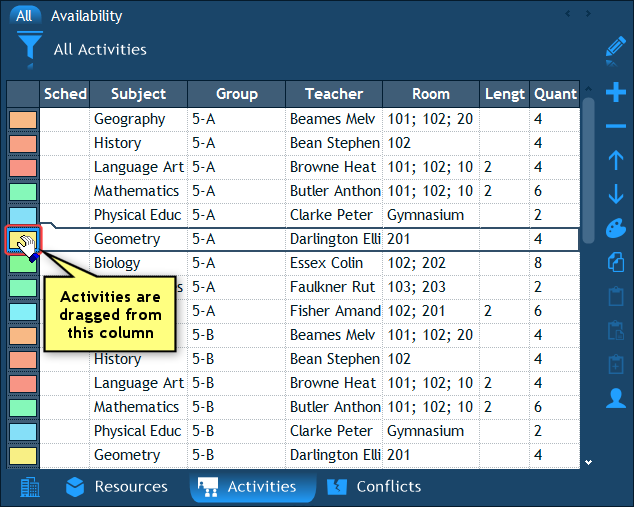
Now press the left mouse button and keep holding it pressed. This begins the drag-and-drop operation. You will see the activity's dragged cell appear underneath the mouse cursor.
Once you begin the drag-and-drop, the active schedule window will display what is called the "conflict stripes". These stripes inform you on which days and times the activity's resources are free, double booked or blocked. This information helps you determine where you can drop the activity without causing any conflicts. The detailed explanation about these stripes follows later.
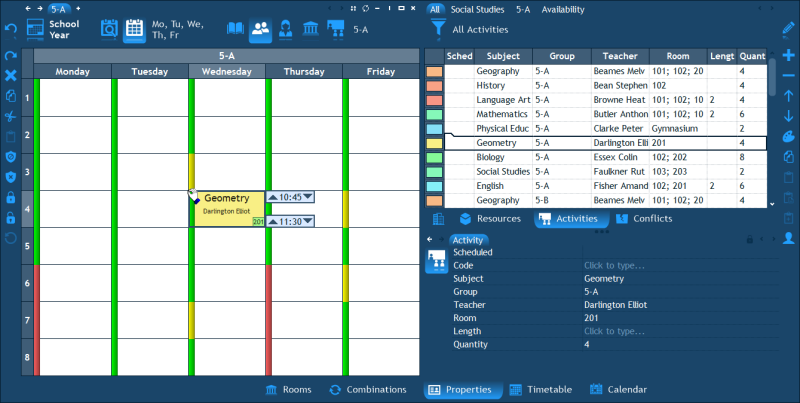
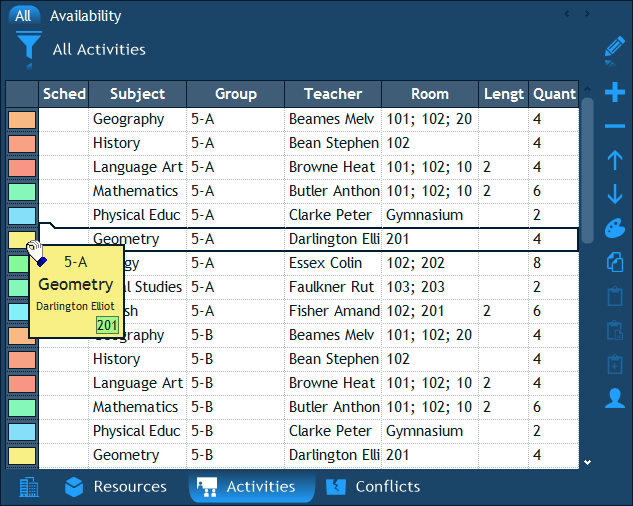
Now that you are in the midst of the drag and drop operation and you are holding down the mouse button, move the mouse cursor over and above the main schedule window. You will see a cell that follows the mouse anywhere you move it. That cell is a preview of how the schedule would look like were you to drop the activity at that spot. When you are satisfied with the future cell position, release the mouse button. That will schedule the activity and conclude the drag and drop operation.
Drag and Drop Moving
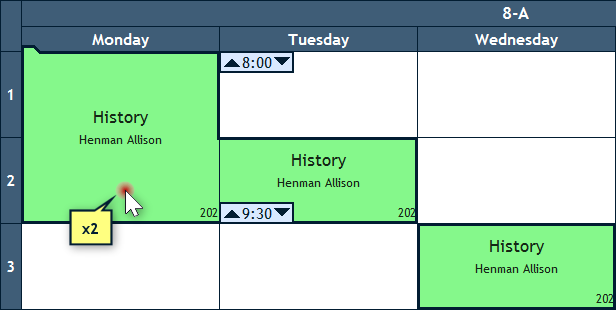
Moving of cells is also accomplished using drag and drop, and just like scheduling it requires that a cell be selected prior to moving it. A cell is selected simply by clicking on it.
When it's selected, you will see a small tab appearing at its top left corner. That tab is very important, because that is where you need to place the mouse cursor in order to move the cell. When the mouse is above the tab, the cursor will change into a hand cursor and when it does, it means that you can start dragging the cell.

To start dragging, press the mouse button and hold it pressed. You will see that the schedule displays the "conflict stripes" just like it did when you were dragging an activity. Move the mouse over to the destination cell and release the mouse button to complete the move.
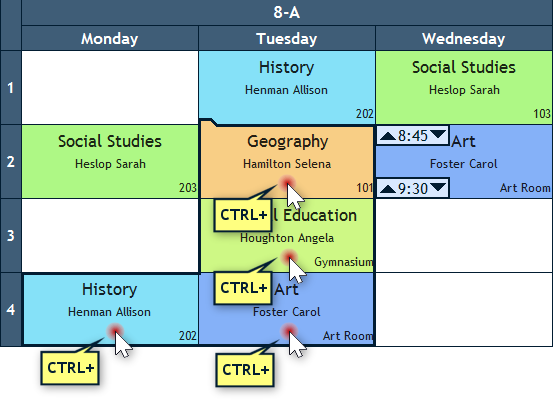
Drag and Drop Copying
Just like you can move a cell using drag and drop, you can duplicate it. To accomplish this, hold down the Ctrl key on the keyboard when you are dragging the cell. You will see that the old cell remains in place and a new cell which is a duplicate of the original cell is the one being moved around when you are dragging.
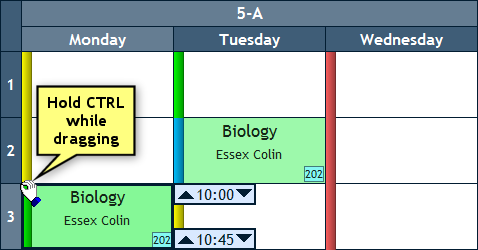
Notice how you can speed up the process of scheduling the same activity multiple times using this Ctrl key technique. Remember that the first time you drag and drop an activity you start from the Activities pane which resides at the right corner of the screen. In the second time, however, you no longer need to go back to the Activities pane to drag and drop it. What you can do is hold down the Ctrl key on the keyboard and duplicate the cell that you had just scheduled. If you do it like this, you don't need to travel a long distance with the mouse back and forth from the Activities pane.
The Main Schedule Pane
Now that we have learned how to schedule activities and our schedule is no longer entirely empty, it is a good time to explain the features of the main schedule pane which is located at the center of the screen and displays all the schedules and their cells.
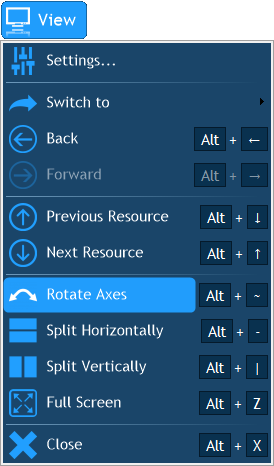
Flipping the Axes
If you are used to having the X axis display the times or the periods, you can flip the default positioning of the axes. To do this, click on the "View" menu button at the top of the workspace, and then select "Flip Axes".
Enlarging Rows or Columns
By default, the program tries to fit the entire schedule into a single window. If you are uncomfortable with the amount of information you see or with the little space that cells occupy, you can enlarge their size. To do this, place the mouse cursor in between two axis cells. When you do, the mouse cursor will turn into a two-sided arrow. Now press the mouse button, hold it down and drag the mouse right (X axis) or down (Y axis). You will see how all the axis cells become larger and larger as you continue to drag the mouse.
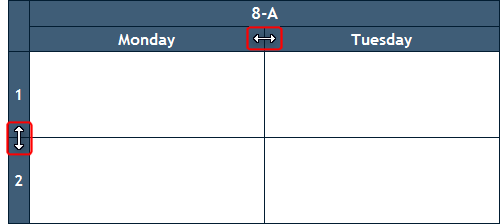
Notice that it's impossible to enlarge only a single row or column. All the rows or columns are enlarged proportionally. That is because the program has to maintain a precise scale of time units.
Double Clicking a Cell
If you double click a cell, two things happen. First, all the cells which contain the same activity and which are part of the currently shown schedule automatically get selected as well. Second, the activity becomes selected in the list of activities at the right.
These two things are comfortable in various situations. Mainly, since all the activity's cells are selected, you can delete them all in a single operation without having to go at it one by one. In addition, in case you would like to edit any of the activity's properties, you do not have to search for it in the list because it's already focused and selected there. All you have to do it click on it and the Properties pane will display its properties.
Selecting Multiple Cells
Now that we have described how all the cells of an activity become selected if you double click any of them, all that is left is to describe how to select any arbitrary group of cells (even if they don't contain the same activity). This is easily accomplished by holding down the Ctrl key on the keyboard while clicking on the cells. You can select any group of cells this way. They don't necessarily have to be near each other or on consecutive days or times.
Note that when there are multiple selected cells, only one cell is the "leader" cell. Only that cell has the time markers and the drag and drop tab. The leader cell is the last cell that you Ctrl-clicked. You can change the leader cell by Ctrl-clicking again on one of the previously selected cells. The leader cell's role is related to drag and drop. You see, if you are going to drag and drop the selected cells, you will need to place the mouse cursor over the leader cell's top-left tab. When you drag and drop the leader to a new day and time, the rest of the cells will maintain their relative positions to the leader and be scheduled appropriately.
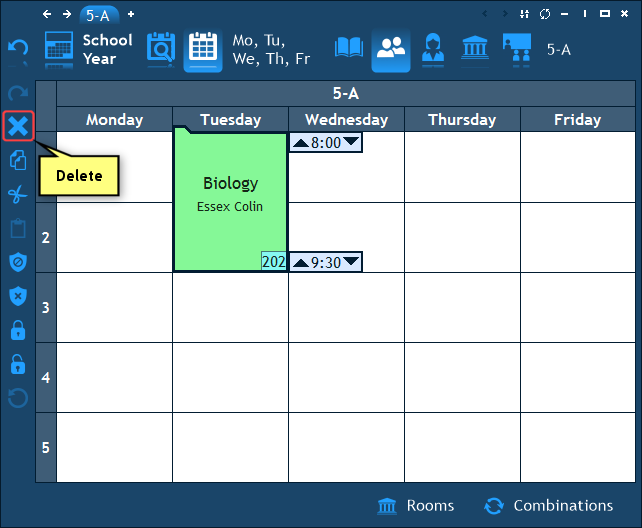
Deleting Cells
The deletion of cells is quite straightforward. What's selected is what will be deleted. Once you have selected the cell(s) to delete, press the Delete button on the keyboard or click on the red X button in the leftmost toolbar and the cell will be deleted. You can undelete it using the Undo button.
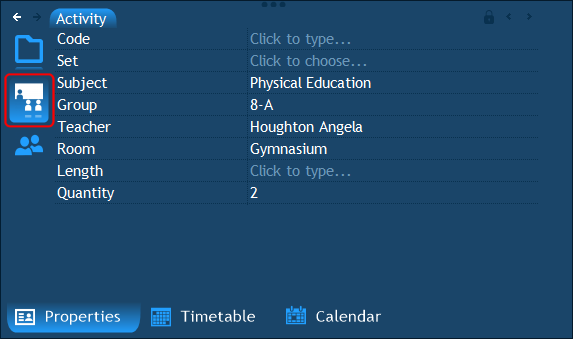
Cell's Properties
Whenever you select one or more cells in the main schedule pane, the Properties pane displays the selected cells' properties.
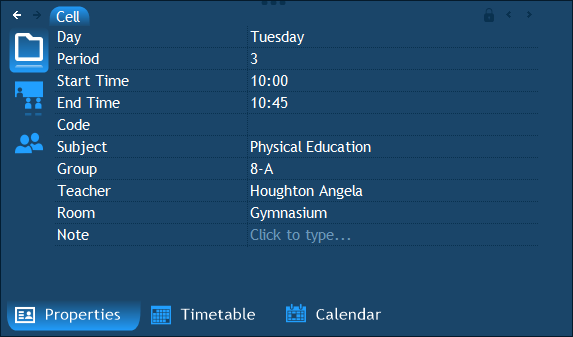
These properties serve several purposes. First, whenever the cell itself is not large enough to display all its scheduled resources, the properties pane can be used to get a full picture of the cell's contents. Second, a cell's properties include, among other things, the scheduled activity's properties. So you always have a quick shortcut to the activity's properties from any of its cells' properties.
Third, the properties pane allows you to choose optional resources for the cell – resources which are not part of the activity. For example, if you have left the Room or Students resource of an activity unfilled, it means that they are optional and can be selected on a cell to cell basis, i.e. you can select different rooms or students for different cells. This is accomplished via the Properties pane – under the "Cell" item's "Room" and “Students” properties. Once you make a selection there, it will be added to the cell's booked resources.
Make sure not to confuse the properties under the "Cell" item with the properties under the "Activity" item. The ones under "Activity" are the activity's properties and making selections there affects all the cells of the activity. For example, if you select a Room under "Activity" it's as if you've selected a room while editing the activity's properties, meaning that it will be applied to all the occurrences of the activity, rather than only to that of the currently selected cell.
The cell's day and time are also properties which can be modified. If you select a cell and then change the Start Time property for example, the cell will be rescheduled at the new time. This is yet another way to move a cell (as opposed to using drag and drop). In the same manner you can change the End Time and even the Day.
The last, but not least, cell's property, is the Note property. The note is a free-text field which can be added to any cell and which appears at the bottom of the drawn cell (although the appearance can be customized using the View Settings). When you add a note to a cell, the note will be displayed in all the participating resources' schedules. Notes are visible in printouts as well.
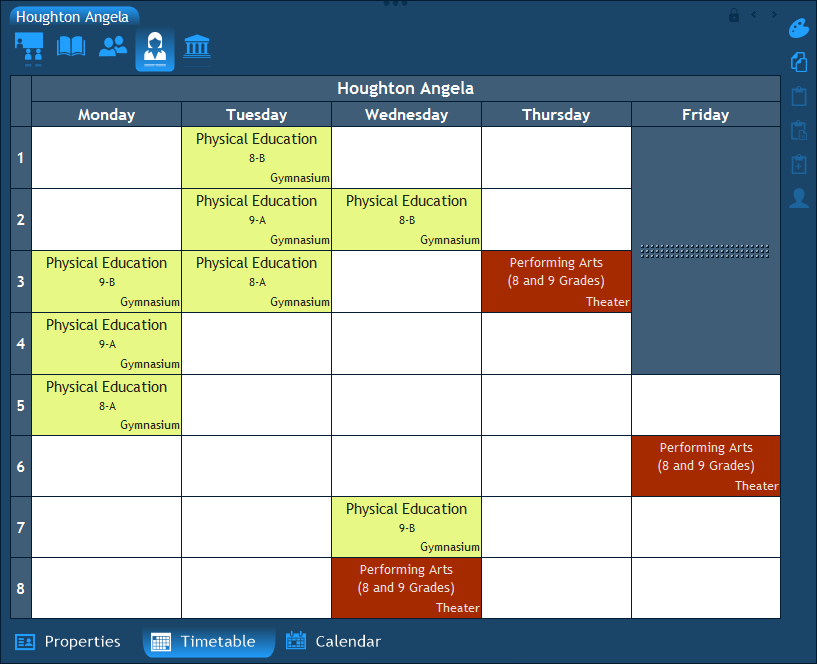
The "Timetable" Tab
In addition to displaying a cell's properties, the Properties pane includes an additional tab named "Timetable". As opposed to the "Properties" tab which displays textual information about the cell's participating resources, the "Timetable" tab actually displays these resources' schedules.
If you click on the "Timetable" tab, you will be able to see the schedule of each resource which belongs to the cell you initially selected. The resources are grouped by their type. You can view the combined schedules of all resources of the same type in a single schedule. You can switch between the types using the tabs which display the resources' names at the top of this pane.
 HAVE A QUESTION? EMAIL US: