 Activities
|
User's Guide Topics
|
The Activities pane comes after the Resources pane and is the third pane in the data-entry workflow.
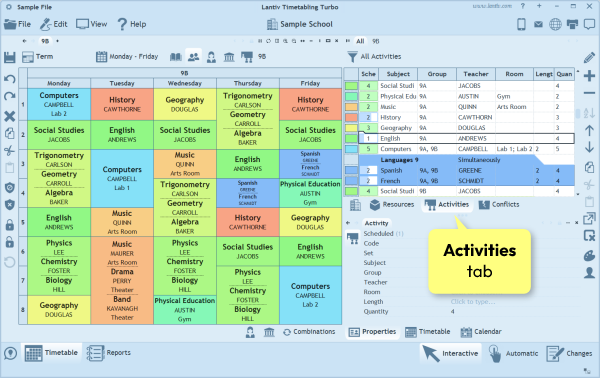
Entering activities is a crucial step in the scheduling process. As you will soon discover, activities form the core building blocks from which the entire timetable is created.
Contents
- 1 What are activities?
- 2 Activities List
- 2.1 Scenario 1: Subject, Group and Teacher
- 2.2 Scenario 2: Subject, Group, Teacher and a Single Room
- 2.3 Scenario 3: Subject, Group, Teacher and Multiple Possible Rooms
- 2.4 Scenario 4: Multiple Groups, Multiple Teachers, Simultaneous Activities
- 2.5 Scenario 5: Direct Enrollment of Students to Activities
- 2.6 How to choose which columns are visible?
- 3 Entering Activities
- 3.1 How to add activities?
- 3.2 How to edit activities?
- 3.3 How to fill in the values of an activity?
- 3.4 How to quickly select a single resource in a pop-up list?
- 3.5 How to modify a property of multiple activities at once?
- 3.6 How to quickly create one activity for each resource?
- 3.7 How to enter length and quantity?
- 4 Sets
What are activities?
An activity represents an association of several resources, all of which are scheduled together as one unit in the timetable.
A few facts about activities:
- When an activity is scheduled at a specific time, all participating resources are booked for that activity at that time.
- A single activity can be scheduled multiple times during the week. Each occurrence is represented by one cell in the timetable. The total number of planned cells for the week is defined in the activity’s Quantity property.
- If you delete an activity from the timetable of one of its resources, it is automatically removed from all of them.
- When an activity needs to span several consecutive periods, the Length property defines how many periods it occupies. For example, an activity that must always be scheduled across two consecutive periods should have a Length value of 2.
- An activity does not necessarily have to include all resource types. For example, you can create an activity without specifying a room, students, or equipment.
- An activity can include multiple resources of the same type. For example, it may involve 3 teachers and 2 classes.
- Different cells of the same activity can involve different resources. For example, the activity may be scheduled in Room 1 on Monday and in Room 2 on Wednesday. This is explained in more detail below.
- Multiple activities that need to be scheduled simultaneously can be grouped into a Set, as explained below.
Activities List
You can find the list of activities in the Activities pane. Think of it as a spreadsheet: each row represents one activity, and the columns show the resources involved, along with other activity-related details such as statistical values or custom text properties. Which columns you actually need to see depends on the school, so this list can look a bit different from one place to another. In the sections below, we’ll walk through a few common scenarios and show examples of how the activities list might be set up.
Scenario 1: Subject, Group and Teacher
This is the most basic activity setup. Each activity includes a single named group of students (without listing individual students), one teacher, and one subject. This scenario is most common in elementary schools, where each group is assigned a single classroom and all of that group’s activities take place in the same room. In this case, explicitly assigning rooms is unnecessary—the group name already implies the classroom. As a result, rooms do not appear in the activities list.
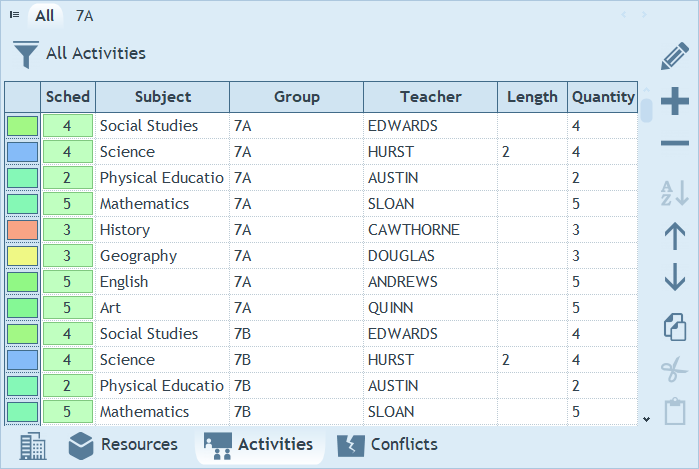
A few notes that apply to this scenario, as well as to all of the scenarios below:
- The leftmost column shows a color assigned to one of the activity’s resources. In most examples, colors are assigned to subjects, so this column usually displays the subject’s color.
- The "Sched." column on the left shows how many periods each activity has already been scheduled for. (The screenshots were taken after most of the activities had been scheduled.)
- Length defines the duration of a single occurrence of an activity.
- Quantity defines the total planned duration of all occurrences of the activity during the week.
- For example, an activity may have a Length of 2 and a Quantity of 4. This means the activity always spans two consecutive periods and is scheduled for a total of four periods during the week (that is, two occurrences of two periods each). When an activity lasts only one period, there is no need to enter 1 in the Length field, since 1 is the default.
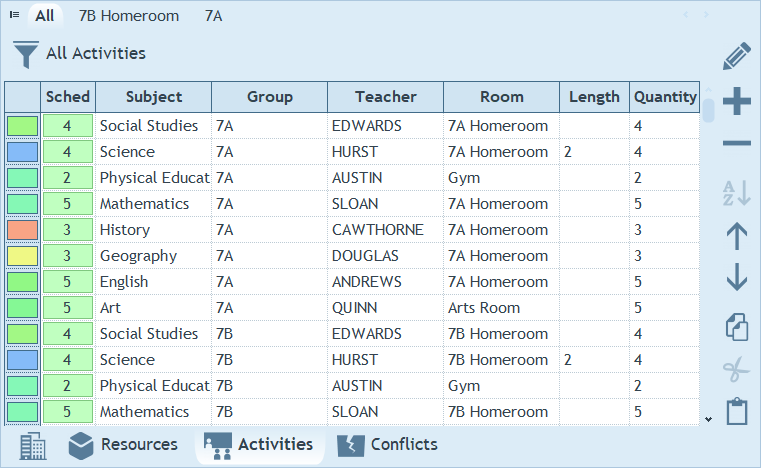
Scenario 2: Subject, Group, Teacher and a Single Room
This scenario is very similar to the previous one, with one key difference: each activity is also assigned a room. We start with the simplest scenario, where an activity may be scheduled in only one specific room. That room is selected in the Room column of the activities list:
Scenario 3: Subject, Group, Teacher and Multiple Possible Rooms
In this scenario, each activity has a subject and a single teacher, but it can be scheduled in a range of suitable rooms. Each occurrence of the activity may take place in a different room:
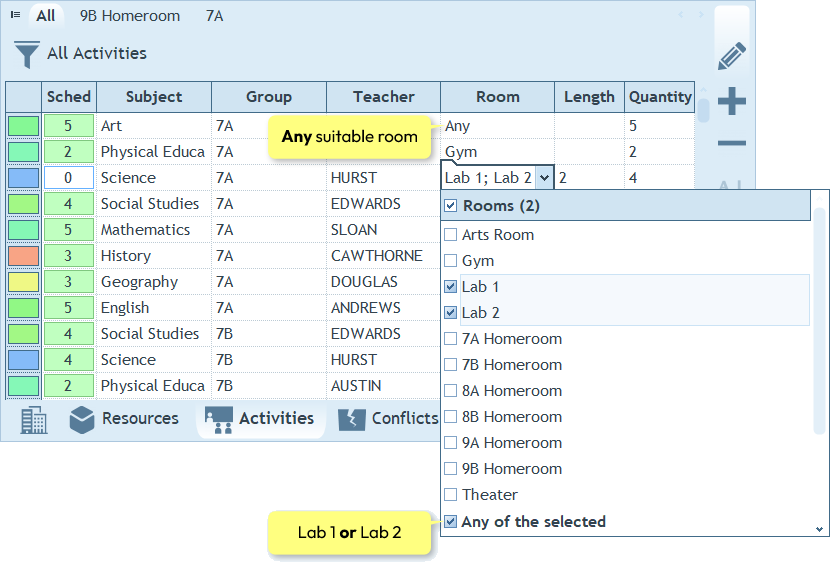
There are two ways to allow room selection on a per-cell basis (a cell represents a single occurrence of an activity), instead of using the same room for all occurrences:
- Option 1: Select "Any" at the bottom of the room selection list and do not select any specific rooms. This allows each cell of the activity to be scheduled in a different room, with the room chosen separately for each occurrence.
- Option 2: Select multiple possible rooms from the list and then check the option "Any of the selected". This also enables per-cell room selection (and in Automatic mode, the software will assign rooms automatically), but only from the set of rooms you selected.
Scenario 4: Multiple Groups, Multiple Teachers, Simultaneous Activities
In many schools, it is common for multiple groups, teachers, or even entire activities to be scheduled at the same time—that is, simultaneously. Here are a few typical examples:
- A Gym activity may require two teachers, such as one for the boys and one for the girls.
- Two classes may be combined to take part in a single Arts & Crafts activity.
- Students in the 8th grade may be divided into three simultaneous Math activities based on their proficiency level, with each activity having its own teacher and room.
Here is how the examples above appear in the activities list:
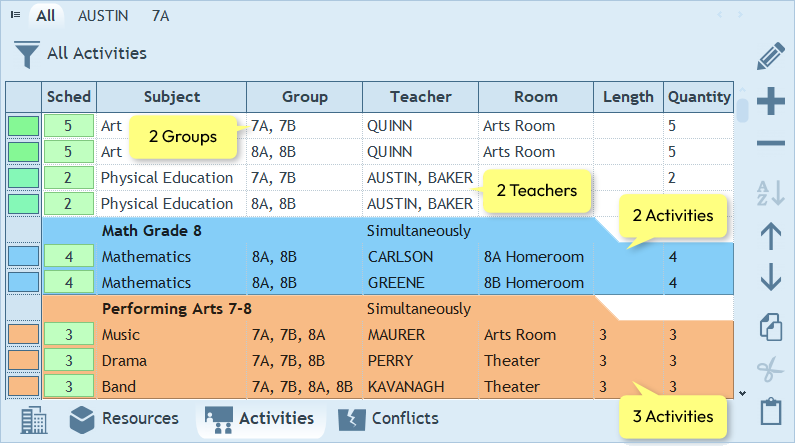
Notes:
- To select multiple resources in any field, simply click the checkboxes next to the relevant resource names in the popup list while editing the field.
- In the example above, the grouped Mathematics and Performing Arts activities marked with the word "Simultaneously" are called Sets. The process of creating such Sets is explained below.
Scenario 5: Direct Enrollment of Students to Activities
Unlike the previous scenarios, where student names were not entered at all, this scenario includes activities in which student names are explicitly specified. For activities in which an entire group (or several groups) participate in full, there is no need to list individual students. However, when only part of a group participates, you can define exactly which students are involved in that activity. Once students are explicitly assigned to an activity, the program automatically understands that only those students participate - not the entire group. As a result, the activity will appear only in the timetables of the specified students. This is particularly useful for elective subjects, where students select different options and each student attends activities based on their chosen subjects.

How to choose which columns are visible?
As you have seen in the scenarios above, the activities list can look quite different depending on an institution’s needs. You can control which columns appear in this list from the Institution pane’s Properties page (under the Activity resource). On that page, you need to do the following:
- Enable the desired properties by checking the boxes next to them.
- Set the column widths for the columns you want to appear in the activities list.
- If needed, add custom properties.
Here is an example showing how the columns are configured to produce the layout used in the first scenario above:
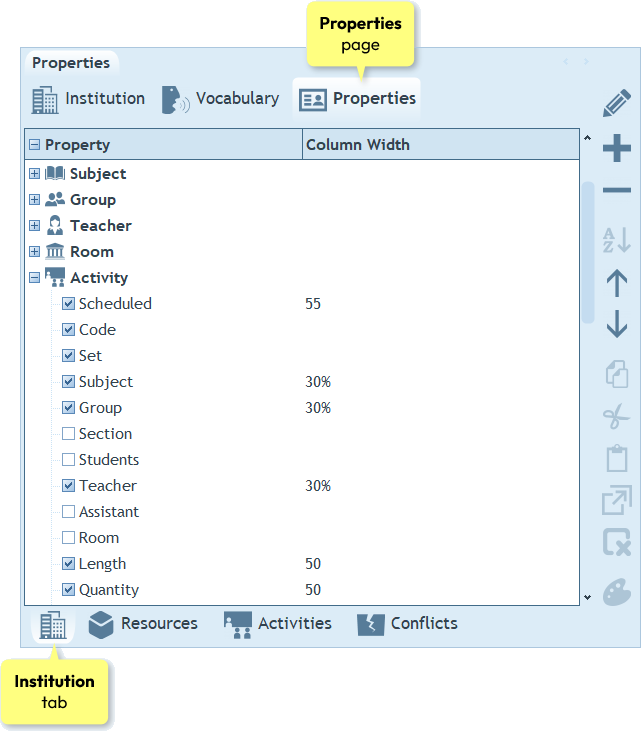
Once you're done, click the Activities tab to see the effect of your configuration.
Entering Activities
The Activities pane, located on the right-hand side of the workspace, is where activities are entered and managed. In this section, we will explain how to add activities and how to edit them efficiently.
How to add activities?
The list of activities is organized like a spreadsheet: each row represents a separate activity, and the columns represent the activity’s resources. Since the list is initially empty, you can begin by adding a few rows. To do this, click the plus button on the right-hand toolbar and select the second option: Activities (20). This adds 20 new rows to the list. If you prefer to add a single row, select the first option - Activity.
How to edit activities?
As with resource entry, there are two ways to enter activity data: you can either select an activity and edit its values in the Properties pane, or enable Editing Mode (by clicking the pencil button on the right-hand toolbar) and edit the values directly in the spreadsheet. Since you are starting with a blank spreadsheet, it is usually more convenient and faster to begin entering activities in Editing Mode.
How to fill in the values of an activity?
After adding a few empty rows to the list and enabling Editing Mode, you can begin entering the resources for the first activity. Click inside the cell you want to fill, then click the arrow button to open a pop-up list of resources. Each resource in the list has a checkbox next to it. Click the checkbox to select a resource; click it again to deselect it. When you are finished selecting resources, click anywhere outside the pop-up list. The selected resources will then appear inside the cell.
How to quickly select a single resource in a pop-up list?
If you need to select only one resource from a pop-up list, simply click the resource name instead of its checkbox. This automatically selects that resource and immediately closes the pop-up list, so there is no need to click outside it. This shortcut speeds up the process. This method works in all pop-up lists throughout the program.
How to modify a property of multiple activities at once?
To speed up activity entry, the program allows you to apply the same value to multiple activities without editing them one by one. There are two ways to do this:
- Using the Properties pane:
- First, select multiple activities. You can hold down the Ctrl key while clicking individual activities, or click the first activity and then Shift+click the last to select a range. Once the activities are selected, change the desired property in the Properties pane. The new value will be applied to all selected activities.
- Using copy and paste in Editing Mode:
- In Editing Mode, select a cell whose value you want to replicate and press Ctrl+C to copy. Then select the target cells and press Ctrl+V to paste.
How to quickly create one activity for each resource?
Suppose your school has 50 teachers and you would like to create 50 activities — one for each teacher. Instead of selecting teachers separately in 50 different rows, you can proceed as follows:
- First, select all teachers for a single activity by clicking the checkbox at the top of the pop-up list. This creates one activity that includes all 50 teachers.
- Select the cell containing the 50 teachers and press Ctrl+C to copy it.
- If necessary, add enough empty rows to the list (at least 50 in this case) using the plus button.
- Select the first empty row you added, right-click, and choose Paste One by One (or press Ctrl+1):
Explanation: The Paste One by One function distributes the copied resources across separate rows. When you copy multiple resources from a single cell, this function pastes each resource into its own activity.
Note: If you copy multiple cells containing multiple resources (for example, 50 teachers and 10 rooms), the program generates all possible combinations (500 activities in this example).
Finally, if you no longer need the original row, select it and click the minus button to delete it.
How to enter length and quantity?
The Length and Quantity fields of an activity are text fields that are entered using the keyboard. Click inside the relevant field and type a value, such as 2 (meaning two periods).
Notes:
- If the quantity is not limited or not important, enter 0 in the Quantity field. The zero will automatically be displayed as the infinity symbol.
- If the length is one period, you may leave the Length field empty, since one period is the default value. In all other cases, the length should be specified.
- If an activity has different lengths on different days, enter the minimal length here. This provides a starting point when dragging and dropping the activity into the timetable. You can always adjust the length later using the Properties pane or by holding down the Shift key while dragging the cell's time markers.
Sets
A Set is a collection of activities that must be scheduled at the same time, that is, simultaneously.
Sets are commonly used when students are divided into different activities based on their level in a subject or their areas of interest, and those activities must take place at the same time. For example, in a high school where students choose a major subject, some students may study Chemistry while others study Computer Programming. These activities are typically scheduled in the same time slot so that all students are engaged at the same time.
In the list of activities, Sets appear as colored folders containing multiple rows (in contrast to regular activities, which appear as standalone white rows). The color of a Set can be selected in the Properties pane. A Set can also have a name (title), which is shown in the first row. This title can appear in all timetable cells where the Set is scheduled.
Below is an example of a Set containing three simultaneous activities:
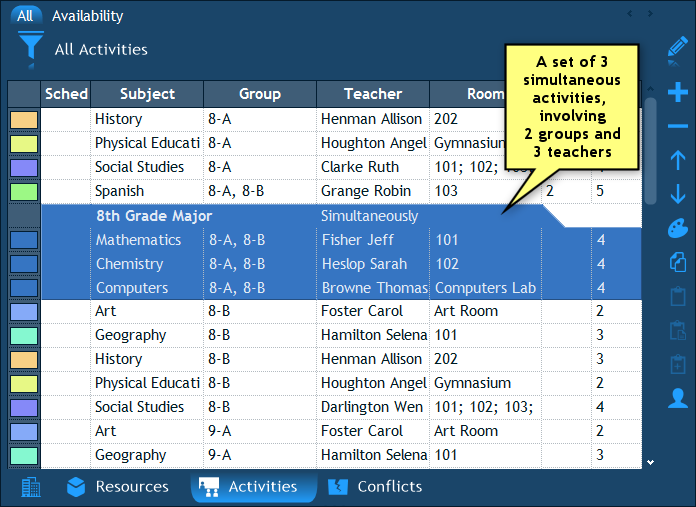
Some notes about Sets:
- All activities within a Set are scheduled together in both Interactive and Automatic timetable construction modes. In Interactive mode, dragging, dropping, or deleting any activity in the Set moves or deletes all activities in the Set. In Automatic mode, the program schedules all activities in the Set simultaneously.
- The Quantity and Length of each activity in a Set must be defined separately.
- Each activity in a Set can be configured with multiple optional rooms (by selecting "Any of the selected resources" at the bottom of the Rooms pop-up list). In Automatic mode, the program assigns a room to each activity individually.
- Activities within the same Set may include the same resources. For example, two activities in a Set may involve the same group or teacher. This is allowed, and when such activities are scheduled simultaneously, the program does not treat it as a conflict, since they belong to the same Set.
How to create a new set?
To create a new set, click the plus button on the right-hand toolbar and select Set. The new set will be inserted immediately after the currently selected row.
By default, a set is created with 3 empty activities.
- If you need the set to contain more than 3 activities, click anywhere inside the set, then click the plus button again and select Activity. A new activity will be added to the set.
- If you need the set to contain fewer than 3 activities, select the unnecessary activities and click the minus button to delete them.
How to create a new set from existing activities?
If the activities that should form the set already appear in the list, you can combine them into a set as follows:
- First, select the relevant activities: click the first activity, then hold Ctrl and click the other activities.
- Next, click the plus button on the right-hand toolbar and select Set. The selected activities will be combined into a single set.
How to add an existing activity to an existing set?
If an activity has already been entered in the list and you would like to add it to an existing set, proceed as follows:
- First, click any row within the set.
- Then, hold Ctrl and click the row of the activity you wish to add.
- Finally, click the plus button on the right-hand toolbar and select Set. The selected activity will be moved into the existing set.
How to enter a set's title and color?
As mentioned earlier, each set has a title. The title can be displayed in all timetable cells where the set is scheduled. To enter the set's title, click inside the first column of the first row of the set (make sure Editing Mode is turned on), and type the desired title. Alternatively, you can enter the title in the Properties pane by filling in the set's Name property.
A set also has an assigned color. This color takes precedence over the colors of the individual resources participating in the set's activities. As a result, the timetable cells in which the set's activities are scheduled will display the set's color, rather than the colors of the individual resources (as in regular activities). The set's color can be defined in the Properties pane. First, select the first row of the set in the activities list, then choose the desired color in the Color property.
Note: As in the resources entry phase, you can assign colors automatically to all sets in your list using the color palette button on the right-hand toolbar.
How to remove an activity from a set?
To remove an activity from a set, follow these steps:
- First, select the row of the activity.
- Then, in the Properties pane below the list, click near the "Set" property and clear the check mark.
The activity will be removed from the Set and will become a regular standalone activity.
The next chapter: Interactive Timetabling.
 Have a question? Email us at SUPPORT@LANTIV.COM