
Changes
The Changes module introduces a two-layer scheduling system. For each date in the calendar, there are now two timetables:
- The timetable planned in advance (created in the standard interactive mode).
- The timetable that reflects unplanned events and other day-to-day changes.
Note: The Changes module is useful only for schools that need to maintain records of both timetables: the original planned timetable and the modified timetable that actually took place. If you do not need to keep a record of both versions, you can safely skip this chapter.
Contents
How to switch to Changes mode?
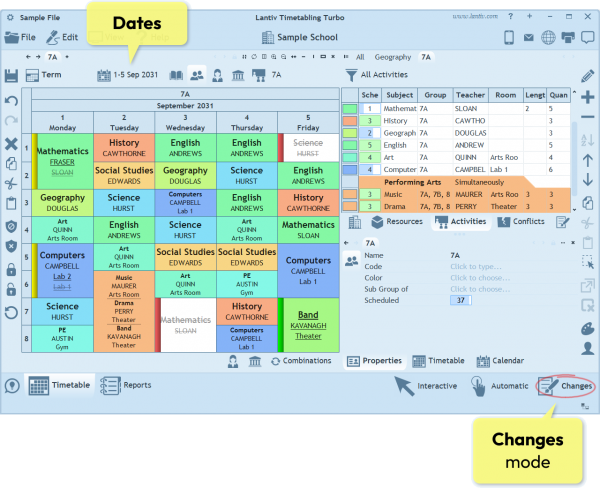
To begin making changes, click the Changes button in the bottom-right corner of the screen.
In Changes mode, you start from the planned timetable. Therefore, when you switch to Changes mode for the first time, you will initially see exactly the same timetable as in Interactive mode.
The main difference is that, in Interactive mode, you work with generic days (Monday, Tuesday, etc.), whereas in Changes mode those generic weekdays are mapped to the corresponding calendar dates of the term. This mapping is based on the Day of Week property of each generic day, so make sure this property is defined for all generic days.
Once you enter Changes mode, you will notice that the day selector at the top changes into a calendar date selector, and the generic weekdays are replaced by the corresponding calendar dates.
Working in Changes mode is no different from working in Interactive mode. All the same operations are available, including scheduling activities, moving cells, deleting cells, and copying and pasting cells. There is, however, one key principle in Changes mode: any modification you make to an activity cell applies only to that specific cell; other cells belonging to the same activity are not affected by the change.
How to make changes?
Let's look at a few common scenarios that require timetable changes and see how to make those changes.
Scenario 1: Teacher Substitution
The most common change is assigning a substitute teacher to an existing activity while keeping the same period and time.
To do this, select the cell you want to modify, then choose a different teacher from the Teacher property in the Properties pane in the bottom-right corner of the screen. When you open the teacher list, all teachers who are available during the selected time slot are marked with a green stripe next to their names.
After the change is made, the original teacher's name will appear crossed out, and the substitute teacher's name will be shown underlined. In addition, the cell will be marked with a yellow stripe in the timetable, indicating that it has been modified. In the substitute teacher's timetable, the new cell will be marked with a green stripe, indicating that it is a newly added cell.
Scenario 2: Activity Replacement
The next scenario is replacing one activity with another activity from the same pool of class activities. To do this, first delete the original cell. Next, identify which other activity cells can be moved into the vacant time slot (by clicking the tab of the canceled cell and holding the mouse button). Finally, duplicate one of those cells into the canceled time slot (by right-clicking the tab of the cell and dragging with the right mouse button).
Another option is to drag and drop an activity directly from the Activities list. To see which activities can be scheduled in the canceled cell, enable the Availability button at the top of the Activities list. Activities that can be scheduled in the selected time slot will then be highlighted with a green stripe.
Scenario 3: New Activity
In this scenario, you want to schedule a completely new activity for a class. The new activity may involve a teacher who does not normally teach the class, a different subject, or any other combination of resources. It can be scheduled either in addition to or instead of an existing class activity.
To schedule a new activity, select the desired time slot in the class timetable, then click the New Cell tab at the top of the Properties pane. Enter any of the activity details, such as Subject or Teacher, and a new cell will immediately appear in the timetable. You can then continue filling in the remaining properties, such as Room, in the Properties pane.
Scenario 4: Sick Leave
Suppose a teacher has called in sick and a replacement needs to be assigned for each of that teacher's activities. In this scenario, we first open the teacher's timetable and block the entire day. Optionally, we can add a note to the block, such as Sick Leave. Once the teacher's day has been blocked, all activities scheduled for that day are automatically canceled. We can then review each activity individually and assign a replacement teacher. This can be done either from the teacher's timetable or from the timetables of the affected classes.
How to restore a cell?
Any cell that was modified in Changes mode can be easily restored to its original state. To do so, select the changed cells (this applies to all types of changes: canceled cells, added cells, and modified cells) and choose Edit → Restore from the main menu or the right-click menu. Alternatively, click the Restore button on the left-hand toolbar or press Backspace on the keyboard.
The change will be removed, and the original cell will reappear.
Note: Restoring a cell is not the same as undoing an action. You can undo an action only immediately after it is performed, whereas you can restore any changed cell at any time.
How to view all existing changes?
Similar to the Conflicts pane, the Changes pane lists all existing changes in the timetable. The Changes pane is located on the right-hand side of the workspace and can be displayed by clicking the Changes tab, which is located next to the Conflicts tab.
Important: By default, the Changes pane displays only the changes related to the resource currently selected in the navigation pane. For example, if you are viewing a class timetable in the main timetable pane, the Changes pane will display only the changes involving that class. To display the changes for all resources, click the All tab at the top of the Changes pane.
In the list of changes, each row represents a single change. If you double-click a row, the program will open the timetable of the resource involved in that change and automatically select the corresponding cell.
The last tab above the Changes pane represents the day and time currently selected in the main timetable pane. Clicking this tab displays only the changes that occur at that specific day and time, filtering out all others.
If you want to view only certain types of changes (for example, cancellation changes only), use the filter button above the list, which is labeled All Types by default.
The next chapter: Reports.