
Automatic Timetabling
Unlike the Interactive Mode, in which activities are scheduled at the user’s discretion, in the Automatic Mode it is the program's responsibility to decide when each activity should be scheduled, so that no conflicts occur and all the constraints you have entered are satisfied as optimally as possible. As a result, for many schools, principals, and timetable administrators, the program’s automatic scheduling capability is in fact a huge time saver.
Our software’s automatic solver uses a highly intelligent algorithm that surpasses any manual method of timetable construction. Before describing how to operate it, let’s take a brief look at how it works.
Contents
How does the software construct the timetable automatically?
The basic idea behind the automation algorithm is straightforward: it is all about improvement — gradual and carefully calculated improvement. The timetable construction problem is broken down into a series of moves, each intended to improve the timetable in some way.
At each step of the process, the program evaluates what is currently wrong with the timetable based on the data and constraints you have entered. It then selects the most critical violation and spends a certain amount of time searching for a way to resolve it. Initially, the program dedicates only 3 seconds to finding such solutions, allowing the simpler violations to be resolved quickly during the first iteration.
The violations that are not resolved during the first iteration are moved to what we call a pending queue. In the second iteration, the program increases the time dedicated to solving each problem to 15 seconds and makes another attempt to resolve the pending-queue violations from the previous iteration. This process is then repeated several times, with the allocated solving time increasing further in each new iteration.
There is one more important aspect of the automation algorithm to understand: how the algorithm actually evaluates whether a move improves the timetable or not. As you may recall, each constraint is essentially a mathematical formula that measures some aspect of the timetable. When you enter a constraint, you define limits for the result of this formula for a specific resource. A violation occurs when the result falls outside the Min/Max or Desirable ranges that you have defined, and the difference between the actual result and the allowed limit becomes the violation’s score.
To evaluate the timetable, the program sums the scores of all violated constraints. The result is a single absolute number known as the timetable’s total score. This total score is what the program uses to determine whether a move improves the timetable: if the combined effect of a move improves the total score, the move is considered beneficial and is therefore applied by the software.
How to switch to Automatic mode?
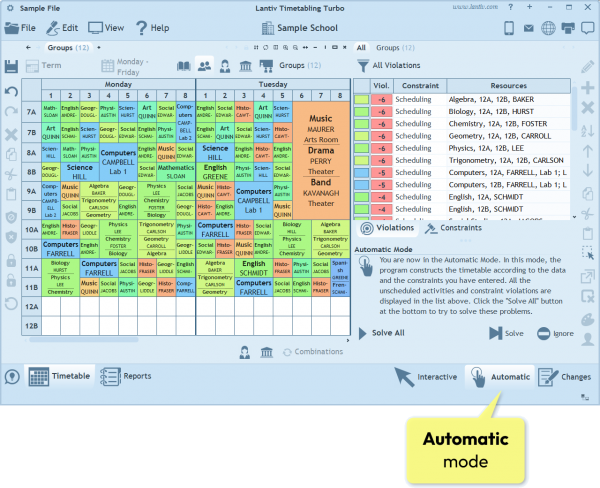
In order to launch the automatic construction process, you first need to switch to the Automatic Mode by clicking the "Automatic" button at the bottom-right corner of the screen.
Note: In Automatic Mode, you cannot make manual (interactive) changes to the timetable. You can only enter constraints. To make manual changes again, you will need to switch back to Interactive Mode.
What is the Violations pane?
Once you enter the Automatic Mode, the program replaces the Resources and Activities pane with the Violations pane. The Violations pane lists all the unfulfilled constraints in the current timetable. These are the violations that the automatic solver will work on during the automatic timetable construction.
Note that unscheduled activities are also considered as violations of the "Scheduling" constraint, and they too will appear in the Violations pane initially. Therefore, if the timetable is empty and this is the first time you are entering the Automatic Mode, all your activities will appear in the list with a "Scheduling" violation.
How to launch automatic construction?
To launch the automatic construction process, simply click the Solve All button at the bottom of the Violations pane.
Note that the Violations pane contains two additional buttons at the bottom: Solve and Ignore. The Solve button can be used to launch the automation for a specific violation in the list. To do so, select the violated constraint in the Violations list and then click Solve.
How to ignore a violation?
The Ignore button can be used to instruct the program to ignore a specific violation. The program will then treat that particular violation score as "legal" and will no longer spend time trying to resolve it.
Note that only that specific score is ignored. If the violation becomes more severe, it will still be treated as a violation. For example, suppose there is a constraint limiting a teacher to a maximum of 2 gaps, and the teacher currently has 3 gaps (that is, a violation score of "+1"). If you press Ignore on the "+1" violation, only that one extra gap will be considered acceptable. If, in a future timetable, the teacher ends up with 4 gaps, the additional gap will not be ignored, and the program will attempt to reduce the number of gaps back to 3.
What happens during automatic construction?
The program will begin resolving the existing violations one by one. The progress of the automatic construction process is reflected by three figures displayed at the bottom of the Violations window:
- The number of remaining problems – The number of problems (violations) that still exist in the timetable.
- The number of improvements made – The number of positive changes made by the software that improve the timetable’s quality. Note that this number will usually be higher than the number of problems, because fully resolving a violation often requires multiple improvement steps. For example, if a violation consists of 2 extra gaps, it will usually take two separate improvement steps to eliminate those gaps.
- Pending problems without solution – The number of violations that the program could not resolve during the current iteration. The program will attempt to resolve them again in the next iteration, while dedicating more time to finding a solution for each one.
You can stop the automatic solver at any time by clicking the Stop button. You can later resume the process simply by clicking the Solve All button again.
The next chapter: Constraints.